Roofing
Safe and Effective Methods for Cleaning Roof Shingles
Maintaining your roof means knowing the best methods for cleaning roof shingles safely and effectively. Your shingles protect your home, and regular care prevents damage from moss, algae, and dirt buildup. Proper cleaning extends their life and improves your home’s appearance.
Why Cleaning Roof Shingles Is Important
Cleaning roof shingles removes harmful growths that cause premature aging. Moss and algae trap moisture, leading to leaks and structural damage. Additionally, keeping shingles clean protects your roof warranty and boosts curb appeal. To avoid costly repairs, cleaning your roof periodically is essential.
Tools and Materials You’ll Need
Before starting, gather the right tools and supplies:
- Slip-resistant boots and work gloves
- Safety harness if you climb on the roof
- Garden hose with spray nozzle
- Roof rake and leaf blower
- Pump sprayer and soft-bristled brush
- Bleach or vinegar for cleaning solutions
- Plastic tarps to protect plants around your home
Having these items ready ensures a smooth and safe cleaning process.
Step-by-Step Guide to Cleaning Roof Shingles
Step 1: Prepare the Area
Clear furniture, toys, and other items near your home. Protect plants with water and plastic tarps before applying any cleaning solutions. This prevents damage from runoff and chemicals.
Step 2: Remove Loose Debris
Use a roof rake or leaf blower to remove leaves, sticks, and dirt from shingles. Clearing debris prevents gutter clogging and prepares the surface for cleaning.
Step 3: Mix Your Cleaning Solution
For asphalt shingles, mix one part bleach with three parts water. Alternatively, use diluted white vinegar if you prefer a natural cleaner. Never mix bleach and vinegar. Always check your shingles’ manufacturer instructions for recommended cleaning agents.
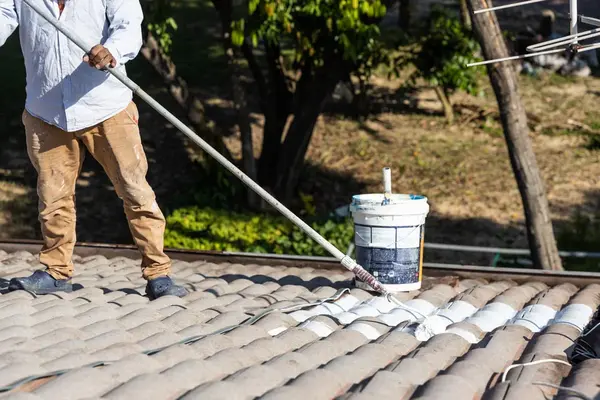
Step 4: Apply the Cleaning Solution
Spray the cleaning solution evenly over the roof, starting from the top. Avoid soaking the shingles heavily. Let the solution sit for 15 to 20 minutes. This softens moss, algae, and grime for easier removal.
Step 5: Rinse the Roof
After letting the solution work, rinse thoroughly with a garden hose at normal water pressure. Avoid pressure washers as they can damage the shingles’ protective granules. Keep gutters clear for proper drainage.
Step 6: Address Stubborn Spots
If moss or algae remain, gently scrub those areas with a soft brush. Do this carefully to avoid harming the shingles. Repeat rinsing afterward to remove all residue.
Step 7: Clean Up
Remove plastic tarps from plants and water them well to wash away any remaining chemicals. Inspect gutters and downspouts again for any leftover debris.
Safety Tips for Cleaning Roof Shingles
Always prioritize safety by wearing slip-resistant boots and a secure harness if climbing. Avoid working on wet or rainy days. Use gentle cleaning methods to protect the shingles’ granules, which shield your roof from weather damage. Harsh scrubbing or high-pressure water can cause costly harm.
FAQs About Cleaning Roof Shingles
- How Often Should You Clean Your Roof
Typically, roof cleaning should happen every 1 to 3 years to keep shingles in good shape. - Can Bleach Damage Shingles?
Bleach can damage shingles if undiluted. Always dilute it as recommended for safe use. - Is Pressure Washing Safe?
Pressure washing can strip protective granules and damage shingles, so avoid it. - What’s the Cost of Professional Cleaning?
Professional roof cleaning usually costs between $0.20 and $0.70 per square foot, depending on roof size and location. - What’s the Best Cleaning Solution?
Start with plain water using a garden hose. If needed, try diluted vinegar or bleach solutions.
Conclusion: Keep Your Roof Strong and Attractive
Proper cleaning roof shingles techniques help maintain your roof’s durability and look. By following these safe and effective steps, you protect your home and extend your shingles’ life. Start your roof cleaning routine today and enjoy a beautiful, well-maintained home.